19 thg 10, 2011
Chương trình Demo các phương pháp mã hóa cổ điển
Language : Java.
Version 1.0.0
Write by Sungha
References code on the internet
Source code : http://www.mediafire.com/?ec7632r731me7vv
Jar file : http://www.mediafire.com/?h5tas2xc3x1l5tp
Thám mã Hill Cipher : http://www.mediafire.com/?oqy6ptgwkx77v6p
Zend Framework & MVC Model
Trước đây khi code 1 website, bạn code thuần viết ra các hàm riêng biệt và các xử lý đuợc tách ra từng file riêng biệt, điều đó có vẻ như là đơn giản với các dự án nhỏ và chỉ có mình bạn tham gia, sẽ ra sao nếu là 1 dự án lớn và luợng nhân sự tham gia dự án thay đổi theo thời gian, làm sao để nguời phát triển về sau hiểu đuợc và tiếp tục phát triển sản phầm bạn đã làm truớc đó.
Tại sao ?
Zend Framework là 1 PHP Framework đuợc lập trình trên PHP dựa theo mô hình MVC (cái này mình sẽ giải thích phía duới) sẽ giúp bạn tách bạch các phần xử lý riêng biệt cho website của bạn, nó giúp cho code của bạn trong sáng hơn, dễ quản lý, chỉnh sửa và nâng cấp.
Mô hình MVC
Model: khối giao tiếp với database, bạn sẽ viết các query cũng như các xử lý logic ở đây.
View: khối trình bày, hiểu nôm na là 1 nơi chứa 1 loạt các file html của bạn để hiện thị cho nguời xem
Controller: khối điều khiển, sẽ là nơi bạn trực tiếp viết các xử lý lấy các request từ url và form để thao tác trực tiếp với Model, sau đó dùng View để hiển thị ra. OK đã hiểu tàm tạm về MVC
Vì sao mình chọn Zend Framework, he he vì đơn giản là mình thấy nó rất tổng quát và đầy đủ so với các PHP Frameworks khác, hơn nữa nó còn đuợc hỗ trợ tối đa từ công ty Zend.
Nào chúng ta hãy cùng tìm hiểu Zend Framework
Zend Framework là gì ?
- Sử dụng PHP 5
- Viết huớng đối tuợng
- Cung cấp mô hình tiên tiến MVC
- Là 1 phần mềm nguồn mở có sự hỗ trợ cộng đồng
- Cung cấp 1 loạt các ứng dụng API của các nhà cung cấp hàng đầu như Google, Yahoo, Flick...
Zend Framework làm đuợc những gì ?
- Tạo ứng dụng web theo mô hình chuẩn MVC
- Url tiêu chuẩn, ngắn gọn
- Hỗ trợ phân quyền tới từng Action
- Có các thành phần thư viên hỗ trợ API của các nhà cung cấp như Google, Yahoo, Flick
- Quản lý code dễ dàng, liệt kê và lấy các truy vấn history
- Dễ dàng phát triển thêm các ứng dụng nhúng, sử dụng Plugins
Sơ qua về các thành phần trong zend framework
- Zend_Controller
- Module này giúp lấy các request từ phía Client và thực thi nó bằng các Action
- Zend_Db
- Dựa trên đối tuợng PDO (PHP Data Objects), cung cấp cách thức giao tiếp với database
- Zend_View
- Chính là tầng View trong mô hình MVC
- Zend_Acl
- Quản lý phân quyền trong toàn bộ site
- Zend_Feed
- Giúp xử lý với Rss và Atom feeds
- Zend_Filter
- Chức năng lọc các chuỗi nhập vào xem có hợp lệ với yêu cầu không, ví dụ như kiểm tra 1 chuỗi là Email hoặc là ký tự số.
- Zend_Pdf
- Tạo và xử lý các file PDF
- Zend_Service_Amazon, Zend_Service_Flickr, and Zend_Service_Yahoo
- Cung cấp truy cập tới các dich vụ web APIS của các nhà cung cấp như Amazon, Flick, Yahoo
- Zend_XmlRpc
- Tạo ra giao tiếp XMLRpc (giao tiếp client-server, các xử lý tập chung phía server, client chỉ để hiển thị).
(Suu tam)
14 thg 10, 2011
8 thg 9, 2011
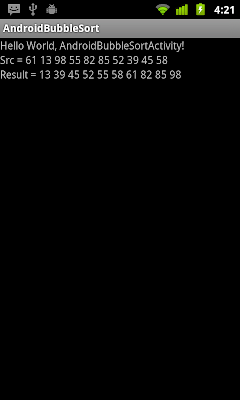
Bubble Sort
package com.exercise.AndroidBubbleSort;
import java.util.Random;
import android.app.Activity;
import android.os.Bundle;
import android.widget.TextView;
public class AndroidBubbleSortActivity extends Activity {
TextView src, result;
int[] data = new int[10];
/** Called when the activity is first created. */
@Override
public void onCreate(Bundle savedInstanceState) {
super.onCreate(savedInstanceState);
setContentView(R.layout.main);
src = (TextView)findViewById(R.id.src);
result = (TextView)findViewById(R.id.result);
Random random = new Random();
String stringSrc = "Src = ";
for (int i = 0; i < data.length; i++){
data[i] = random.nextInt(100);
stringSrc += data[i] + " ";
}
src.setText(stringSrc);
bubblesort();
String stringResult = "Result = ";
for (int i = 0; i < data.length; i++){
stringResult += data[i] + " ";
}
result.setText(stringResult);
}
void bubblesort() {
int min;
for (int i = 0; i < data.length - 1; i++){
min = i;
for (int j = i + 1; j < data.length; j++){
if (data[j] < data[min]){
min = j;
}
}
if (i != min){
int tmp = data[i];
data[i] = data[min];
data[min] = tmp;
}
}
}
}
Nguồn : Android-er.
10 thg 6, 2011
Mùa Tôm
Đêm khuya lặng lẽ
Mưa rơi khe khẽ
Tay cầm chuột...
Ta vẽ ...
Những đường kẽ ...
.........Xong hình cần vẽ
Bỗng ...
Chấm sáng... đốm sáng...
Nghĩ đến ma...
sờ sợ. tắt máy đi ngủ. hết ngày cũ....
24 thg 5, 2011
Source Code Game Sudoku Android
Đây là toàn bộ source code game Sudoku. Các bạn download về kham khảo vào phát triển thêm.
Link download : Tại Đây
19 thg 5, 2011
Tao Alert Dialog with OK and Cancel options Trong Android
AlertDialog.Builder myAlertDialog = new AlertDialog.Builder(AndroidAlertDialog.this);
myAlertDialog.setTitle("--- Title ---");
myAlertDialog.setMessage("Alert Dialog Message");
myAlertDialog.setPositiveButton("OK", new DialogInterface.OnClickListener() {
public void onClick(DialogInterface arg0, int arg1) {
// do something when the OK button is clicked
}});
myAlertDialog.setNegativeButton("Cancel", new DialogInterface.OnClickListener() {
public void onClick(DialogInterface arg0, int arg1) {
// do something when the Cancel button is clicked
}});
myAlertDialog.show();
(Suu tam).
Doc Doan Text trong EditText
Khi ban nhap vao button Play Random Tetx . Chuong trinh se doc doan van ban cua ban voi ngon ngu ma ban chon san. O day minh chon ngon ngu la English.
Do dung ubuntu chua co unikey nen viet khong dau. Mong cac ban thong cam.
Hinh cua chuong trinh :
15 thg 5, 2011
Intent I
Demo Intent I
res/layout/main.xml
file Episode.java
res/layout/main.xml
<?xml version="1.0" encoding="utf-8"?>
<LinearLayout xmlns:android="http://schemas.android.com/apk/res/android"
android:orientation="vertical"
android:layout_width="fill_parent"
android:layout_height="fill_parent"
android:padding="8dp" >
<Button
android:id="@+id/buttonViewContacts"
android:text="View Contacts"
android:layout_width="fill_parent"
android:layout_height="40px" >
</Button>
<Button
android:id="@+id/buttonViewCallLog"
android:text="View Call Log"
android:layout_width="fill_parent"
android:layout_height="40px" >
</Button>
<Button
android:id="@+id/buttonViewGallery"
android:text="View Gallery"
android:layout_width="fill_parent"
android:layout_height="40px" >
</Button>
<Button
android:id="@+id/buttonViewPhone"
android:text="View Phone Call"
android:layout_width="fill_parent"
android:layout_height="40px" >
</Button>
</LinearLayout>
file Episode.java
package com.example.intends;
import android.app.Activity;
import android.content.Intent;
import android.os.Bundle;
import android.view.View;
import android.view.View.OnClickListener;
import android.widget.Button;
public class Intends extends Activity {
/** Called when the activity is first created. */
@Override
public void onCreate(Bundle savedInstanceState) {
super.onCreate(savedInstanceState);
setContentView(R.layout.main);
Button buttonContacts = (Button) findViewById(R.id.buttonViewContacts);
buttonContacts.setOnClickListener(new OnClickListener() {
public void onClick(View v) {
// TODO Auto-generated method stub
Intent i = new Intent();
i.setAction(Intent.ACTION_VIEW);
i.setData(android.provider.Contacts.People.CONTENT_URI);
startActivity(i);
}
});
Button buttonCallLog = (Button) findViewById(R.id.buttonViewCallLog);
buttonCallLog.setOnClickListener(new OnClickListener() {
public void onClick(View v) {
// TODO Auto-generated method stub
Intent i = new Intent();
i.setAction(Intent.ACTION_CALL_BUTTON);
startActivity(i);
}
});
Button buttonGallery = (Button) findViewById(R.id.buttonViewGallery);
buttonGallery.setOnClickListener(new OnClickListener() {
public void onClick(View v) {
// TODO Auto-generated method stub
Intent i = new Intent();
i.setAction(Intent.ACTION_VIEW);
i.setData(android.provider.MediaStore.Images.Media.INTERNAL_CONTENT_URI);
startActivity(i);
}
});
Button buttonPhone = (Button) findViewById(R.id.buttonViewPhone);
buttonPhone.setOnClickListener(new OnClickListener() {
public void onClick(View v) {
// TODO Auto-generated method stub
Intent i = new Intent();
i.setAction(Intent.ACTION_DIAL);
startActivity(i);
}
});
}
}
14 thg 5, 2011
Game Sudoku (Android) -- Implementing an About Box
Mục đích của bài này là khi bạn nhấp vào Button About trong màn hình của bài trước. bạn sẽ show ra thông tin về cần thiết về game của bạn.
2 vấn đề chính :
1. Định nghĩa 1 Activity mới và khởi động nó.
2. Sử dụng lớp AlertDialog và hiển thị nó lên.
Thực hiện :
Bạn vào res/layout tạo 1 file xml About.xml như sau :
- <?xml version="1.0" encoding="utf-8"?>
<ScrollView
xmlns:android="http://schemas.android.com/apk/res/android"
android:background="@color/backgound"
android:layout_width="fill_parent"
android:layout_height="fill_parent"
android:padding="10dip" >
<TextView
android:id="@+id/about_content"
android:layout_width="wrap_content"
android:layout_height="wrap_content"
android:text="@string/about_text" />
</ScrollView>
Sau đó bạn vào file strings.xml thêm vào nội dung sau :
- <string name="about_title">About Android Sudoku</string>
<string name="about_text">Sudoku dc phat trien boi Sungha-CN08A-GTVT</string>
Vậy là bạn đã tạo xong nội dung và layout cho About.
Bây giờ bạn vào tạo 1 class About.java bạn viết code như sau :
- package org.example.Sudoku;
import android.app.Activity;
import android.os.Bundle;
public class About extends Activity{
@Override
protected void onCreate(Bundle savedInstanceState){
super.onCreate(savedInstanceState);
setContentView(R.layout.about);
}
}
Trong class Sudoku.java bạn viết code như sau :
- package org.example.Sudoku;
import android.app.Activity;
import android.app.AlertDialog;
import android.os.Bundle;
import android.content.DialogInterface;
import android.content.Intent;
import android.util.Log;
import android.view.View;
import android.view.View.OnClickListener;
import android.view.Menu;
import android.view.MenuInflater;
import android.view.MenuItem;
public class Sudoku extends Activity implements OnClickListener {
/** Called when the activity is first created. */
private static final String TAG = "Sudoku" ;
@Override
public void onCreate(Bundle savedInstanceState) {
super.onCreate(savedInstanceState);
setContentView(R.layout.main);
//Set up clicks listener all button
View continueButton = findViewById(R.id.continue_button);
continueButton.setOnClickListener(this);
View newButton = findViewById(R.id.new_button);
newButton.setOnClickListener(this);
View aboutButton = findViewById(R.id.about_button);
aboutButton.setOnClickListener(this);
View exitButton = findViewById(R.id.exit_button);
exitButton.setOnClickListener(this);
}
///////////////////////////////////////
- public void onClick(View v) {
switch (v.getId()) {
case R.id.about_button:
Intent i = new Intent(this, About.class);
startActivity(i);
break;
// More buttons go here (if any) ...
}
}
Trong AndroidManifest.xml bạn đăng kí bằng dòng lệnh sau :
- <activity android:name=".About"
android:label="@string/about_title" >
</activity>
Tạo Theme cho layout :
Vào trang AndroidManifest.xml them đoạn code sau :
- <activity android:name=".About"
android:label="@string/about_title"
android:theme="@android:style/Theme.Dialog" >
</activity>
Làm đúng các bước trên các bạn có kết quả sau :
10 thg 5, 2011
Display Video thumbnail in ListView
In this exercise, the path of video sources are hard-coded in a String[]. A ListView with thumbnail, and path of the videos will be implemented.
remark: For minimum API Level 8, Android 2.2.
AndroidThumbnailList.java
remark: For minimum API Level 8, Android 2.2.
<?xml version="1.0" encoding="UTF-8"?>
<LinearLayout xmlns:android="http://schemas.android.com/apk/res/android"
android:layout_width="fill_parent"
android:layout_height="wrap_content"
android:orientation="horizontal">
<ImageView
android:id="@+id/Thumbnail"
android:layout_width="wrap_content"
android:layout_height="wrap_content"
android:src="@drawable/icon"/>
<TextView
android:id="@+id/FilePath"
android:layout_width="wrap_content"
android:layout_height="wrap_content"/>
</LinearLayout>
AndroidThumbnailList.java
package com.exercise.AndroidThumbnailList;
import android.app.ListActivity;
import android.content.Context;
import android.graphics.Bitmap;
import android.media.ThumbnailUtils;
import android.os.Bundle;
import android.provider.MediaStore.Video.Thumbnails;
import android.view.LayoutInflater;
import android.view.View;
import android.view.ViewGroup;
import android.widget.ArrayAdapter;
import android.widget.ImageView;
import android.widget.TextView;
public class AndroidThumbnailList extends ListActivity{
String[] videoFileList = {
"/sdcard/Video/Android 2.0 Official Video_low.mp4",
"/sdcard/Video/Android 2.2 Official Video_low.mp4",
"/sdcard/Video/Android 2.3 Official Video_low.mp4",
"/sdcard/Video/Android 3.0 Preview_low.mp4",
"/sdcard/Video/Android Demo_low.mp4",
"/sdcard/Video/Android in Spaaaaaace!.mp4",
"/sdcard/Video/Android in Spaaaaaace!_low.mp4",
"/sdcard/Video/What is an Android phone-_low.mp4"
};
public class MyThumbnaildapter extends ArrayAdapter<String>{
public MyThumbnaildapter(Context context, int textViewResourceId,
String[] objects) {
super(context, textViewResourceId, objects);
// TODO Auto-generated constructor stub
}
@Override
public View getView(int position, View convertView, ViewGroup parent) {
// TODO Auto-generated method stub
View row = convertView;
if(row==null){
LayoutInflater inflater=getLayoutInflater();
row=inflater.inflate(R.layout.row, parent, false);
}
TextView textfilePath = (TextView)row.findViewById(R.id.FilePath);
textfilePath.setText(videoFileList[position]);
ImageView imageThumbnail = (ImageView)row.findViewById(R.id.Thumbnail);
Bitmap bmThumbnail;
bmThumbnail = ThumbnailUtils.createVideoThumbnail(videoFileList[position], Thumbnails.MICRO_KIND);
imageThumbnail.setImageBitmap(bmThumbnail);
return row;
}
}
/** Called when the activity is first created. */
@Override
public void onCreate(Bundle savedInstanceState) {
super.onCreate(savedInstanceState);
setListAdapter(new MyThumbnaildapter(AndroidThumbnailList.this, R.layout.row, videoFileList));
}
}
8 thg 5, 2011
Game Sudoku (Android) -- Tạo Layout cho game
Hnay mình sẽ giới thiệu cho các bạn cách tạo layout cho game sudoku này.
Sau khi hoàn thành chúng ta sẽ có dc kết quả sau :
Trước hết bạn phải hình dung ra rằng game của mình sẽ có layout như thế nào.
ở đây mình tạo layout theo dạng Linear Layout. Các bạn có thể chọn dạng Layout khác tùy ý. Các bạn có thể xem 1 số bài mình đã hướng dẫn tạo layout như :
Trước hết bạn vào trong res/values/colors.xml để tạo background cho game của bạn :
<?xml version="1.0" encoding="utf-8"?>
<resources>
<color name="backgound">#3500ffff</color>
</resources>
Và trong file res/values/strings.xml bạn viết code như sau :
<?xml version="1.0" encoding="utf-8"?>
<resources>
<string name="app_name">Sudoku</string>
<string name="main_title">Android Sudoku</string>
<string name="continue_lable">Continue</string>
<string name="new_game_lable">New Game</string>
<string name="about_lable">About</string>
<string name="exit_lable">Exit</string>
</resources>
Đến đây bạn đã tạo dc màu background cho ứng dụng của bạn và các lable cho các button của bạn sẽ làm sau đây.
Tiếp theo bạn tạo layout chính cho chương trình :
Trong ví dụ của mình, mình chia làm 2 Linear layout.1 cái chứa image logo game của ứng dụng, cái còn lại chức các button.
Bạn vào file layout/main.xml
<LinearLayout
android:orientation="vertical"
android:layout_width="fill_parent"
android:layout_height="fill_parent"
android:layout_weight="1">
<ImageView
android:id="@+id/imgSudoku"
android:layout_width="fill_parent"
android:layout_height="fill_parent"
android:src="@drawable/image"
/>
</LinearLayout>
Logo : ten image của bạn.
Để vẽ các button bạn tạo ra 1 LinearLayout như sau :
<LinearLayout
android:orientation="vertical"
android:layout_width="fill_parent"
android:layout_height="wrap_content"
android:layout_gravity="center">
<Button
android:id="@+id/continue_button"
android:text="@string/continue_lable"
android:layout_width="200px"
android:layout_height="50px"
android:lines="1"
android:layout_gravity="center"
android:padding="10px"/>
<Button
android:id="@+id/new_button"
android:text="@string/new_game_lable"
android:layout_width="200px"
android:layout_height="50px"
android:lines="1"
android:layout_gravity="center"
android:padding="10px"
/>
<Button
android:id="@+id/about_button"
android:text="@string/about_lable"
android:layout_width="200px"
android:layout_height="50px"
android:lines="1"
android:layout_gravity="center"
android:padding="10px"
/>
<Button
android:text="@string/exit_lable"
android:id="@+id/exit_button"
android:layout_width="200px"
android:layout_height="50px"
android:lines="1"
android:layout_gravity="center"
android:padding="10px"
/>
<!-- <TextView
android:text="@string/main_title"
android:layout_width="fill_parent"
android:layout_height="wrap_content"
android:gravity="center"
android:layout_marginBottom="25dip"
android:textSize="24.5sp" /> -->
</LinearLayout>
Các bạn có thể tùy biến các kiểu layout khác nhau cho màn hình game của mình.
Đăng ký:
Bài đăng (Atom)
Bản beta đầu tiên
Sau 6 tháng cả team cặm cụi làm việc điên cuồng, bản alpha cũng được giới thiệu ra toàn bộ công ty và được testing nội bộ công ty mà thôi. ...
-
Phần mềm đọc truyện tranh trên hệ điều hành android là 1 phần mềm cho phép hiển thị tuần tự các hình ảnh của 1 tập truyện được nén lại tron...
-
Đây là 1 bài viết vẽ đường đi giữa 2 tọa độ trên maps sử dụng kml file. Bài viết được lấy trên blog của 1 người TQ. Mình đang làm việc vớ...
-
Hôm nay tôi sẽ trình này cách dùng Web service để kết nối đến CSDL . nhằm giúp các ứng dụng client có thể dễ dàng dùng CSDL cần thiết đang c...